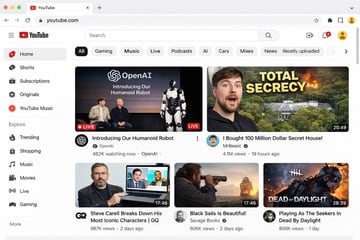
视频流媒体平台主页 UI
{ "type": "网页浏览器 UI 模型", "platform": "{argument name=\"platform name\" default=\"YouTube\"}", "browser_window": { "style": "macOS 浅色模式", "tab": "YouTube", "url_bar": "youtube.com" }, "layout": { "header": { "components": ["汉堡菜单", "平台 Logo", "搜索栏", "创建视频图标", "通知铃铛", "用户头像"] }, "sidebar": { "position": "左侧", "item_count": 11, "sections": [ { "name": "主要", "items": ["首页", "Shorts", "订阅", "原创内容", "YouTube Music"] }, { "name": "探索", "items": ["热门", "购物", "音乐", "电影", "直播", "游戏"] } ] }, "main_content": { "category_tags": { "count": 10, "labels": ["全部", "游戏", "音乐", "直播", "播客", "AI", "汽车", "合辑", "新闻", "最近上传"] }, "video_grid": { "card_count": 5, "cards": [ { "position": "左上", "size": "大", "thumbnail_description": "Sam Altman 和 Greg Brockman 坐在舞台上,旁边是一个站立的人形机器人,文字覆盖 'OpenAI Introducing Our Humanoid Robot',带有 LIVE 徽章", "video_title": "{argument name=\"featured live stream title\" default=\"Introducing Our Humanoid Robot\"}", "channel_name": "{argument name=\"featured live stream channel\" default=\"OpenAI\"}", "metadata": "48.2 万人正在观看" }, { "position": "右上", "size": "大", "thumbnail_description": "左侧是惊讶的男人脸,右侧是隐藏在森林中的巨大豪宅并伴有爆炸效果,粗体黄色文字覆盖 '{argument name=\"top right thumbnail text\" default=\"TOTAL SECRECY\"}'", "video_title": "{argument name=\"top right video title\" default=\"I Bought 100 Million Dollar Secret House!\"}", "channel_name": "MrBeast", "metadata": "410 万次观看,19 小时前,时长 20:49" }, { "position": "左下", "size": "小", "thumbnail_description": "Steve Carell 手持一台显示《办公室》场景的笔记本电脑", "video_title": "Steve Carell 深度解析他最标志性的角色 | GQ", "channel_name": "GQ", "metadata": "98.7 万次观看,2 天前,时长 17:46" }, { "position": "中下", "size": "小", "thumbnail_description": "男人在日落时分透过望远镜观察海面上的帆船", "video_title": "Black Sails Is Beautiful!", "channel_name": "Savage Books", "metadata": "60.6 万次观看,2 天前,时长 17:46" }, { "position": "右下", "size": "小", "thumbnail_description": "来自电子游戏的恐怖面具杀手角色,文字覆盖 'DEAD OF DAYLIGHT'", "video_title": "Playing As The Seekers In Dead By Daylight", "channel_name": "Unknown", "metadata": "80.6 万次观看,1 天前,时长 28:39" } ] } } } }