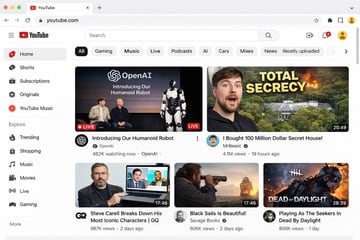
Web Browser UI Mockup
{ "type": "web browser UI mockup", "platform": "{argument name=\"platform name\" default=\"YouTube\"}", "browser_window": { "style": "macOS light mode", "tab": "YouTube", "url_bar": "youtube.com" }, "layout": { "header": { "components": ["hamburger menu", "platform logo", "search bar", "create video icon", "notifications bell", "user profile avatar"] }, "sidebar": { "position": "left", "item_count": 11, "sections": [ { "name": "Main", "items": ["Home", "Shorts", "Subscriptions", "Originals", "YouTube Music"] }, { "name": "Explore", "items": ["Trending", "Shopping", "Music", "Movies", "Live", "Gaming"] } ] }, "main_content": { "category_tags": { "count": 10, "labels": ["All", "Gaming", "Music", "Live", "Podcasts", "AI", "Cars", "Mixes", "News", "Recently uploaded"] }, "video_grid": { "card_count": 5, "cards": [ { "position": "top left", "size": "large", "thumbnail_description": "Sam Altman and Greg Brockman sitting on a stage next to a standing humanoid robot, text overlay 'OpenAI Introducing Our Humanoid Robot', LIVE badge", "video_title": "{argument name=\"featured live stream title\" default=\"Introducing Our Humanoid Robot\"}", "channel_name": "{argument name=\"featured live stream channel\" default=\"OpenAI\"}", "metadata": "482K watching now" }, { "position": "top right", "size": "large", "thumbnail_description": "surprised man's face on the left, a large mansion hidden in a forest with an explosion on the right, bold yellow text overlay '{argument name=\"top right thumbnail text\" default=\"TOTAL SECRECY\"}'", "video_title": "{argument name=\"top right video title\" default=\"I Bought 100 Million Dollar Secret House!\"}", "channel_name": "MrBeast", "metadata": "4.1M views, 19 hours ago, 20:49 duration" }, { "position": "bottom left", "size": "small", "thumbnail_description": "Steve Carell holding a laptop showing a scene from The Office", "video_title": "Steve Carell Breaks Down His Most Iconic Characters | GQ", "channel_name": "GQ", "metadata": "987K views, 2 days ago, 17:46 duration" }, { "position": "bottom middle", "size": "small", "thumbnail_description": "man looking through a spyglass at a sailing ship on the ocean at sunset", "video_title": "Black Sails Is Beautiful!", "channel_name": "Savage Books", "metadata": "606K views, 2 days ago, 17:46 duration" }, { "position": "bottom right", "size": "small", "thumbnail_description": "creepy masked killer character from a video game with text overlay 'DEAD OF DAYLIGHT'", "video_title": "Playing As The Seekers In Dead By Daylight", "channel_name": "Unknown", "metadata": "806K views, 1 day ago, 28:39 duration" } ] } } } }