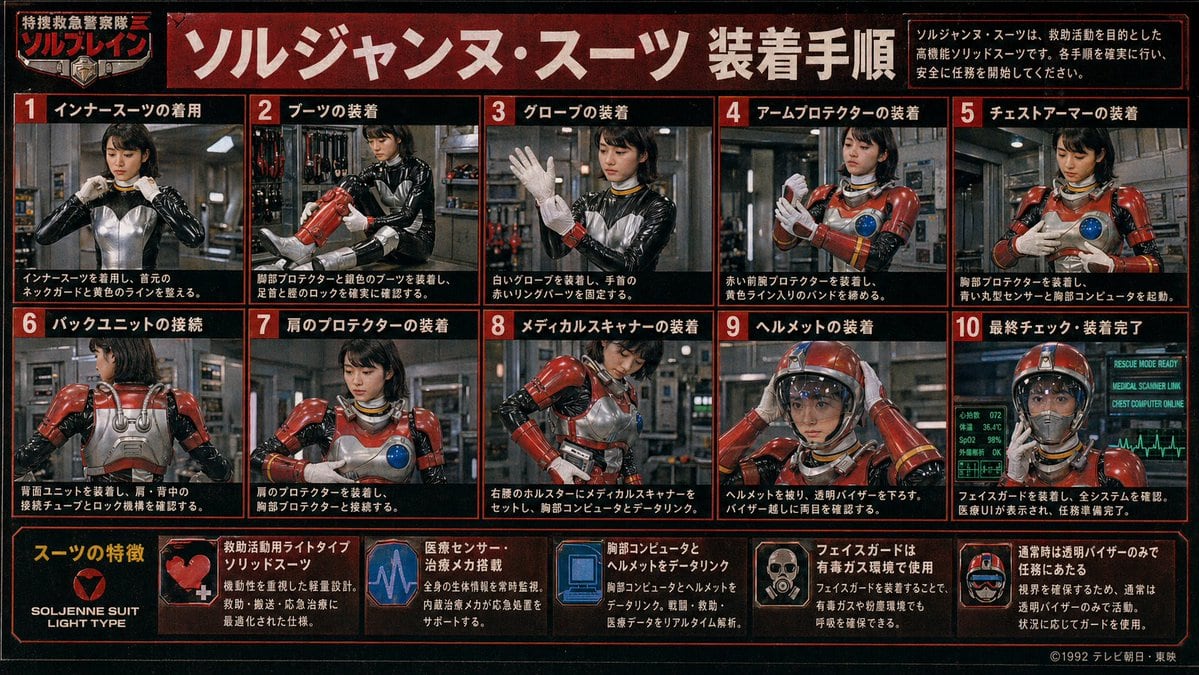
Prompt{"type":"retro Japanese tokusatsu instruction poster","theme":"1980s-1990s emergency hero equipment manual","subject":{"character":"female rescue operative in a glossy black undersuit with metallic silver torso panel, red armored rescue suit components, yellow accent lines, blue circular chest sensor, white gloves, red helmet with clear visor","franchise_style":"fictional TV hero series promotional board","organization_name":"特捜救急警察隊 ソルブレイン","suit_name":"{argument name=\"suit name\" default=\"ソルジャンヌ・スーツ\"}"},"style":{"print":"aged TV magazine or studio prop display board","color_palette":["black","deep red","orange-red borders","white Japanese text","steel gray","emergency red armor","blue monitor glow"],"texture":"heavy film grain, mild blur, low-resolution analog broadcast look, slight vignette, worn poster surface","lighting":"industrial indoor lighting with metallic reflections"},"layout":{"format":"landscape poster with red border grid","header":{"title":"{argument name=\"headline text\" default=\"ソルジャンヌ・スーツ 装着手順\"}","left_badge":"特捜救急警察隊 ソルブレイン","right_note":"ソルジャンヌ・スーツは、救助活動を目的とした高機能ソリッドスーツです。各手順を確実に行い、安全に任務を開始してください。"},"sections":[{"title":"装着手順","position":"upper and middle area in a 2-row grid","count":10,"panels":[{"number":1,"label":"インナースーツの着用","scene":"front view, operative adjusts the collar/neck guard of the black and silver inner suit"},{"number":2,"label":"ブーツの装着","scene":"operative fitting red armored boots and checking shin and ankle locks"},{"number":3,"label":"グローブの装着","scene":"operative raises one hand while putting on white gloves and securing red wrist ring parts"},{"number":4,"label":"アームプロテクターの装着","scene":"operative fastening red forearm protectors and tightening yellow striped bands"},{"number":5,"label":"チェストアーマーの装着","scene":"operative attaching chest armor, blue circular sensor visible on the breastplate"},{"number":6,"label":"バックユニットの接続","scene":"rear view showing silver back unit, shoulder tubes, and connection locks"},{"number":7,"label":"肩のプロテクターの装着","scene":"front three-quarter view, red shoulder armor being mounted and aligned to chest armor"},{"number":8,"label":"メディカルスキャナーの装着","scene":"operative setting a medical scanner device into a right-waist holster and linking it to the chest computer"},{"number":9,"label":"ヘルメットの装着","scene":"operative placing red helmet on her head and lowering the transparent visor"},{"number":10,"label":"最終チェック・装着完了","scene":"fully suited operative facing forward with glowing diagnostic monitors behind her indicating readiness"}]},{"title":"スーツの特徴","position":"bottom strip","count":6,"items":[{"label":"SOLJENNE SUIT LIGHT TYPE","icon":"heart-like red emblem on black background"},{"label":"救助活動用ライトタイプソリッドスーツ","icon":"red armor close-up with white medical cross"},{"label":"医療センサー・治療メカ搭載","icon":"purple-blue heartbeat monitor graphic"},{"label":"胸部コンピュータとヘルメットをデータリンク","icon":"blue computer display graphic"},{"label":"フェイスガードは有毒ガス環境で使用","icon":"small portrait showing face guard deployment"},{"label":"通常時は透明バイザーのみで任務にあたる","icon":"helmet diagram with clear visor"}]}],"footer":{"left":"feature strip integrated into bottom row","right":"{argument name=\"copyright text\" default=\"©1992 テレビ朝日・東映\"}"}},"environment":{"main_panels":"industrial equipment room or rescue base interior with pipes, lockers, tools, and metallic walls","final_panel":"green-blue medical and system status monitors with ECG line and status text such as RESCUE MODE READY"},"composition_notes":"all 10 procedure panels show the same operative step by step; face is soft, low-detail, and partially blurred like a vintage printed guide; each panel framed with thick red borders on black background; bold white Japanese text with red numbered boxes; dense infographic layout filling the entire image","generation_notes":"create a convincing Japanese practical-effects superhero manual poster, not modern clean vector design; prioritize photographic tokusatsu stills arranged as an instruction chart, with authentic period typography and prop-like realism"}